Born of the Midwest, I have a penchant for kitschy recipes. Give me a casserole made with cream of mushroom soup and topped with potato chips, and I could pass out from the hilarious joy of it all. There's just something so great about recipes that are simple and sinfully delicious and contain ingredients that can never be found in nature. Take Haystacks, for example. Melted butterscotch chips, peanut butter and chow mein noodles, for Pete's sake. Wad the mixture up in little mounds, put it in your face, AMAZING.

Now say you take something already perfect like Haystacks, up the fabulous by adding butter and a nice hit of salt, and then dip it in bittersweet chocolate. Hubba, hubba. Not that you need any help (did I tell you that you look terrific today?), but I'd say we're gonna get you a whole bunch of pining Valentines with this one.


When it comes to the ultimate in flavor and textural dreams, these little babies will just about blow your mind. I mean, you've got a chocolate shell, so, awesome already, obviously. But inside that chocolate casing, you've got a creamy, buttery, peanutty filling, studded with two kinds of crunch--a sturdy one from peanuts, and a more delicate, crispy crunch from those crazy chow mein noodles. I-yi-yi.


And the best part? These are so insanely easy, guys. You'll have instant Valentine's Day gifts that will make you an absolute hero. And plenty of leftovers so you can be your own Valentine and savor them slowly while watching trashy reality programming. Perfection!


Peanut Butter Crunch Truffles

Normally, you want commercial peanut butters for baking, but here, the texture and huge peanutty flavor of unsweetened natural peanut butter is the best choice.

Melt the butterscotch chips slowly and gently--they can have a tendency to burn and seize up. 50% power for 30 second increments, stirring well after each interval works well. You can also use a double boiler.

Chow mein noodles can be found in cans or cellophane bags in the Asian foods aisle of your supermarket.

Makes about 30

1 cup well-stirred crunchy natural peanut butter
5 tablespoons unsalted butter, at room temperature
2 ounces butterscotch chips, melted
2 tablespoons sugar
1 teaspoon kosher salt (or about 1/2 teaspoon table salt)
1 1/2 cups chow mein noodles (see note)
8 ounces bittersweet chocolate, chopped

In the bowl of an electric mixer, combine the peanut butter and butter. Beat on medium speed until smooth and creamy. Beat in the melted butterscotch chips, sugar and salt. Reduce the speed to low and stir in the chow mein noodles, until the mixture is well-blended and the noodles have broken up a bit, about 30 seconds or so.

Line a sheet pan with parchment paper, waxed paper or a silicone baking mat. Using a small ice cream scoop or two spoons, scoop out portions of the mixture, about 2 teaspoonsful for each truffle. Roll each portion into a rough ball using your hands. Work quickly when you roll the balls--the mixture will melt a bit with the warmth of your hands and get a bit messy, but no worries, perfection isn't the goal here. Place the truffle centers back on the baking sheet and freeze until very firm--at least 30 minutes.

When you're ready to dip the truffles, place half the chopped chocolate in a double boiler (a glass or heatproof bowl set over a pan of simmering water). Melt the chocolate until it is smooth and fluid. Remove the bowl from the pan and add the second half of the chocolate, stirring again until smooth (this is a quick tempering method that helps to ensure you'll get a nice, shiny chocolate coating). Place the bowl back on the pot of hot water to help keep it warm while you coat the truffles.

Dip each truffle quickly in the chocolate using a fork or a candy dipping tool. Place the dipped truffles back on the lined baking sheet. When all the truffles are dipped, chill in the refrigerator to set the chocolate. Finished truffles can be stored in the refrigerator in an airtight container for up to a week.
»»  READMORE...

A few days after Christmas, I was hurriedly rolling through Target with Little C, enduring her kicks to my femurs from that kid seat thing they put in shopping carts. I rounded a corner and saw an explosion of pink and red and hearts and glitter. They were putting up Valentine's Day stuff before New Year's, people! I was still bloated from Christmas dinner! This all felt so wrong. Like one of Those People, I confronted the staff member assembling the display and was all, "Hey, let me have my holiday hangover one holiday at a time, Target!", and she was all, "Hey, Andy Rooney, why don't you just chill out and feel the love?!"

(Actually, the Target staffer didn't really say that, I think she was mostly just startled by my crazy ponytail and dowdy post-Christmas binge ensemble of Fat Pants and an unreasonably large tunic. But I felt the vibe of what she was thinking.)

A few days later, however, I did indeed get to thinking about Valentine's Day treats because apparently I am very influenced by marketing and mortifying experiences at Target. Ergo, Chubby Hubby Brownies were born.


I've decided I needed to tell you about these brownies now, weeks before Valentine's Day, just in case you're like me and find that baked goods are a key part of any perfect gift for cheesy holidays. Chubby Hubby Brownies, in fact, are the ultimate brownies for dudes. And even if you're not struggling to think of a gift for a dude this Valentine's Day, you need these brownies in your life.

It all started with my very favorite brownie recipe. Then I got to thinking about the glory that is Ben and Jerry's Chubby Hubby ice cream. And then things got a little crazy. Like malted-cheesecake-swirl-caramel-bits-and-peanut-butter-filled-pretzels-crazy. Hoooo, boy.


But like that staffer at Target--innocently doing her job, who I questioned so fervently--ignore my craziness. Just enjoy the results. Because these are really something. And you won't see any references to a Chubby Hubby of my own in this post, because my husband is one of those irritating high-metabolism people who can eat a whole pan of these brownies and never gain an ounce--he just stores them in his hollow leg. But he is my permanent Valentine anyway.


Chubby Hubby Brownies

I used those little cubes of caramel that come wrapped in clear cellophane, because they hold their shape well during baking. You can find several brands of peanut butter-filled pretzels out there--the ones at Trader Joe's are great.

These brownies are especially fabulous chilled. But you didn't hear it from me.

Makes 16

For the swirl:

8 ounces cream cheese, at room temperature
1 large egg
1/3 cup sugar
1 teaspoon pure vanilla extract
1/3 cup malted milk powder
For the brownies:
7 ounces bittersweet chocolate, chopped
8 tablespoons (1 stick) unsalted butter
3 tablespoons unsweetened cocoa powder
3 large eggs
1 1/4 cups sugar
2 teaspoons oure vanilla extract
1/2 teaspoon salt
1 cup all-purpose flour

Add-ins:

4 ounces store-bought caramels, unwrapped and quartered
3 ounces peanut butter-filled pretzel nuggets, lightly crushed

Adjust an oven rack to the lower-middle position and heat the oven to 350 degrees. Line an 8x8- inch baking pan with foil or parchment and spray with nonstick cooking spray.
In a medium bowl, beat together the cream cheese, 1 egg, sugar, vanilla and malt powder until smooth and creamy. Set aside.
In a medium bowl, melt the chocolate and butter together in a double boiler or in the microwave, stirring occasionally until smooth. Whisk in the cocoa powder and set aside to cool.

In another medium bowl, whisk together the 3 eggs, sugar, vanilla and salt until combined, about 15 seconds. Whisk the cooled chocolate mixture into the egg mixture. Stir in the flour with a wooden spoon until just combined.

Spread half the brownie batter evenly in the prepared pan. Sprinkle half the caramel bits and half the crushed pretzels evenly over the top. Pour in the cream cheese mixture and smooth the surface with a spatula. Dollop the remaining half of the brownie batter over the cream cheese mixture in 5-6 generous blobs. Using a butter knife, lightly swirl the brownie batter and cream cheese mixture together. Sprinkle the remaining caramel bits and pretzels over the top.
Bake until slightly puffed and a toothpick comes out clean when tested 1 inch from the edges (it will look a bit underdone in the middle), about 40-45 minutes. Cool on a wire rack to room temperature, about 2 hours, before cutting and serving. Store any leftovers in an airtight container in the refrigerator for 4-5 days.
»»  READMORE...
pound cake

Two years ago I bought 2 dozen vanilla beans for a great price. They were my precious babies so I used them oh so sparingly. The vanilla beans won't be a problem to move and I intend on bringing them with me but I am less stingy about using them now.


I used a Tahitian bean for its floral notes in homemade marshmallows over the Christmas holiday.

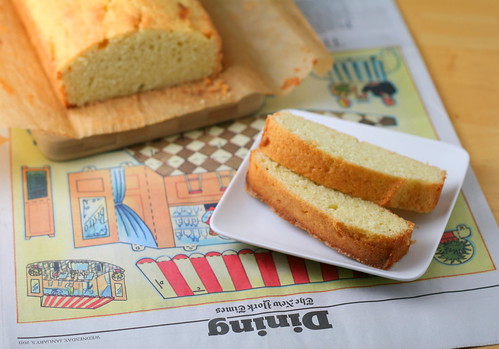
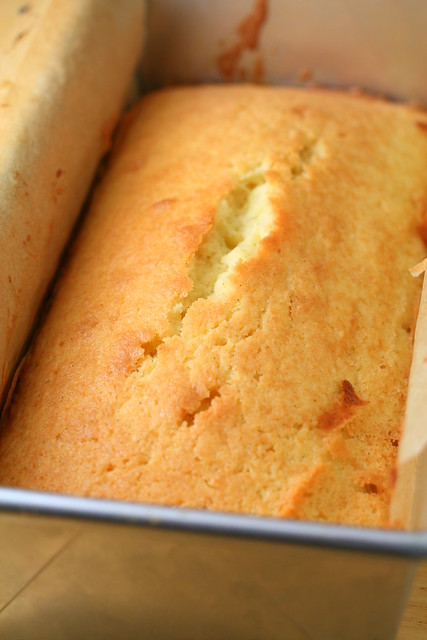
This week, I used the creamy Bourbon bean for a simple vanilla pound cake.

Pound cake is one of those things that almost requires no recipe. Like the name suggests, one pound of butter, sugar, flour, and eggs, or in my case 8 ounces, and a splash of vanilla, pinch of salt, dash of baking powder.

pound cake

The crunchy corners on the end pieces are my favorite, just like corner brownie pieces.

simple vanilla pound cake
8 ounces all purpose flour (approximately 1 3/4 cup)
1 teaspoon baking powder
1/4 teaspoon table salt
8 ounces unsalted butter at room temperature
8 ounces granulated sugar (approximately 1 1/4 cup)
2 teaspoons vanilla extract or one vanilla bean split lengthwise and scraped
8 ounces or 4 large eggs

Preheat oven to 325 degrees F.

Butter and flour or line with parchment a 9 x 5 loaf pan. Set aside. 

In a large bowl, whisk the flour, salt, and baking powder together until no lumps remain. Set aside.

Beat butter until smooth and creamy, approximately 2 minutes. Add the sugar and vanilla and beat until light and fluffy, approximately 5 minutes.

In a separate bowl, add the eggs and beat briefly until eggs are scrambled. Drizzle 1/4 cup of the beaten eggs into the butter mixture and continue beating the butter until the eggs are completely incorporated. Scrape the bottom of the bowl. Repeat with another 1/4 cup of egg and continue until all the eggs have been beaten into the butter, scraping the bowl between each addition.

Sift the dry ingredients into the butter mixture and mix on the lowest setting until almost no streaks or clumps of flour remain.

Finish the batter by folding with a rubber spatula to get rid of any last streaks or lumps.

Scrape the batter into a prepared pan.

Bake at 325 degrees F for 70 to 80 minutes or until a skewer inserted into the center of the cake comes out clean.
»»  READMORE...
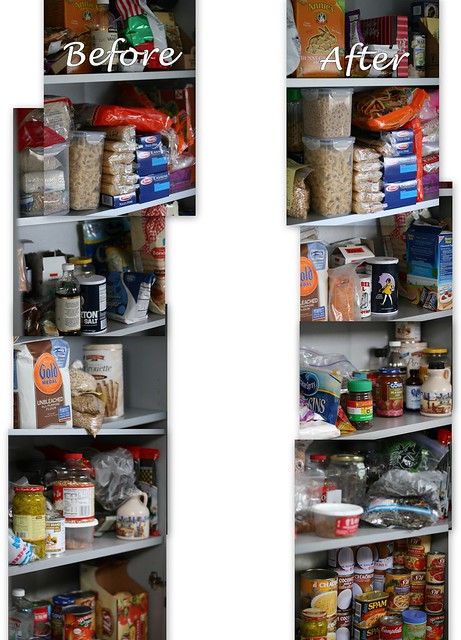
My pantry has become increasingly cluttered over the last few years. The new year was a good time to reorganize and figure out just what is in there. Steven and I are anticipating relocating about a year and a half and I figured we'd better start using some of this stuff up. We've accumulated so much, especially after signing up for a Costco membership, that it will most likely take us the full 18 months to clear out the shelves.

the pantry
the pantry

shelf one: teas, cookies, crackers, and snacks
shelf two: pastas, noodles, rice, and grains
shelf three: dry baking (flour, graham crackers, oatmeal)
shelf four: wet baking (sugars, extracts, syrups, chocolate)
shelf five: dried goods (variety of fungus including two types of wood ear, nori, bean curd skin)
shelf six: sauces, wines, canned (coconut milk, tomatoes, bamboo)

I discovered 4 packs of nori. I had no idea I had so much nori.

We bought an 8 pack of Spam from Costco because we love musubi. Surprisingly, we only have 2 cans left. That means we ate 6 cans of Spam, which is slightly revolting.

A few months ago, Costco was selling an 8-pack of Chaokoh milk for a great price, so I bought a pack. The 8 pack is still unopened. Looks like we'll be eating lots of curry over the next year and a half.

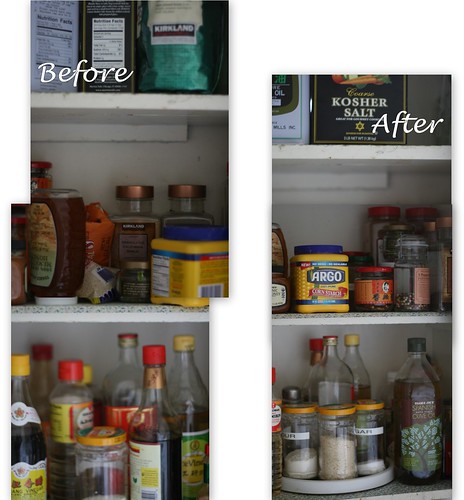
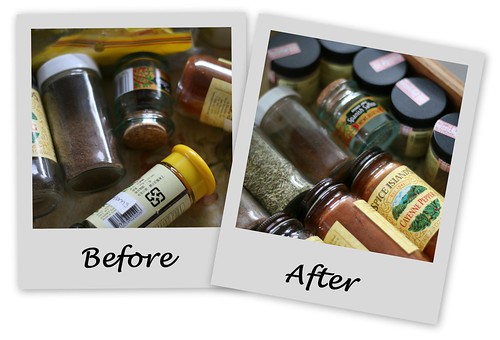
I also organized my sauce cabinet and spice drawer.
pantry cont - sauces

pantry cont - spices
»»  READMORE...

With the New Year upon us, lately I've been asking myself lots of deep, Oprah-esque life questions. For instance, should I give in to the urge to get a practical haircut? How can I watch Real Housewives of Beverly Hills without my husband knowing? How many toddler-hidden raisins will I find in my sofa cushions this week? And most importantly, do Bubble Gum Marshmallows actually count as food if one is over the age of twelve?

I may never truly discover the answers to any of the above questions, and as far as the last one goes about the Bubble Gum Marshmallows, I may not really want to know. I suppose that with their delightful candy-pink coloring and less-than-natural flavoring, these happy little confections might be considered more of an edible craft than actual food. But they're so divine in their whimsical deliciousness, who the heck cares if I might be judged for whipping up such insanity? Add to their decidedly "pink" flavor the high that comes from doing some serious mad scientist work in the kitchen, and you've got yourself some good times in my book.


Speaking of playing mad scientist, have you ever picked up any candy oils? They're like super-powered extracts that come in teeny tiny little bottles. There's some pretty insane flavors out there--definitely the kind of thing that gets your wacky culinary wheels turning. I don't do a whole lot with flavorings like these, but I have a handful of them in my bag of baking tricks that are fun to play with every once in a while when I feel like upping the crazy around here. Like say, creating a confection that gives you the sense that you've just put a fresh piece of bubble gum in your mouth, but instead of merely chewing it for a while until the flavor disappears, you get the awesome experience of actually eating the flavor at its height without it petering out on you.

And if that last sentence makes any sense to you at all, let me know, because we could probably be best friends. And like all good BFFs, I would totally share my stash of bubble gum marshmallows with you, and maybe even my Hello Kitty pencils and Justin Bieber poster collection.


Bubble Gum Marshmallows

The color and flavor of these marshmallows will be completely dependent upon your personal taste and the brands of food coloring and flavoring you use. I tested this recipe using Americolor Soft Pink gel food coloring and LorAnn Bubble Gum flavored candy oil.

Normally, I make this amount of marshmallow in an 8x8-inch pan for nice chunky blocks suitable for hot cocoa. But since these are more of a confection to be eaten straight up, I made them thinner by using a rimmed quarter sheet pan that measured 8x12 inches.


Makes about 2 dozen marshmallows (depending on how you cut them)

2 tablespoons unflavored powdered gelatin (a little over 2 packets)
1/3 cup cold water
1 cup sugar
1/2 cup light corn syrup
1/4 cup water
Pinch of kosher salt
3/4 teaspoon pure vanilla extract
6-7 drops bubble gum flavoring
2-3 drops soft pink gel food coloring
1/3 cup confectioners' sugar, sifted, plus more for dusting

Grease a quarter-sheet pan (or similar baking pan that measures about 8x12 inches) with a small amount of shortening, using a paper towel to rub it lightly and evenly onto the bottom, sides and edges of the pan. Set aside.

Combine the gelatin and 1/3 cup cold water in a small bowl and let the gelatin soften for 5 minutes.

Place the sugar, 1/4 cup corn syrup, 1/4 cup water and pinch of salt in a medium saucepan and stir gently. Clip a candy thermometer onto the pan, and place it over medium-high heat. Bring it to a boil, checking it occasionally--you are looking for it to eventually hit a temperature of 235-240 degrees (soft ball stage).

Meanwhile, pour the remaining 1/4 cup corn syrup into the bowl of an electric mixer fitted with the whisk attachment. Microwave the gelatin on high until it is completely melted, about 30 seconds. Turn the mixer on low, and very slowly pour the melted gelatin into the corn syrup. Keep the mixer running while you check the sugar syrup.

Once the syrup reaches 235-240 degrees, pull it from the heat. Carefully transfer the syrup to a large, heatproof measuring cup or a similar vessel with a spout for easy pouring. Turn the mixer up to medium speed and slowly pour the sugar syrup into the gelatin mixture. When all the syrup has been added, crank the speed up to medium-high and let it go for about 6 to 7 minutes--the candy will turn white and fluffy during this time. Beat in the vanilla. Beat in the bubble gum flavoring, just a couple drops at a time, stopping the mixer to taste the marshmallow, adding more drops until you reach the desired intensity of bubble gum flavor. Beat in the food coloring, drop by drop, until you get the color you're looking for.

Pour the marshmallow into the prepared pan and use an offset spatula spritzed with a bit of cooking spray to nudge it into the corners and smooth the top. Sift confectioners' sugar evenly and generously over the top. Let sit for about 6 hours.

Use a knife to loosen the marshmallow from the edges of the pan and invert it onto a confectioners' sugar-dusted work surface. Dust the marshmallow slab with more confectioners' sugar and cut into whatever size pieces you wish (a pizza cutter works great here for squares). Dip the sticky edges of the marshmallows in more confectioners' sugar, patting off the excess. Store in an airtight container for up to 1 week.
»»  READMORE...

Okay, so I know a whole bunch of us are probably just starting out on some crazy New Year's diets or are giving up sugar or just generally trying to be "good" lately (what does that even mean, anyway?). Perhaps you even found one of my more virtuous recipes speaking to you earlier this week. But like a smoking hot Ryan Gosling sidling up to a nun at a lonely, desolate airport bar, it's just so FUN to walk on the edge sometimes, isn't it?

So I don't want to hear about what you're trying to avoid these days, my darlings. Don't think about what you shouldn't be eating. Think about the snap of a buttery shortbread crust and a creamy cheesecake layer swirled with milky caramel. Just--shh-shhhh, my love. Don't speak. Dulce de Leche Cheesecake Bars. Just let it happen.


This recipe is from the ever-seductive Alice Medrich. Her recipe calls for store-bought or homemade caramel sauce, either of which sounds a-ok to me, particularly when coupled with cheesecake. But I happened to get my hot little hands on a big ol' jar of artisan dulce de leche, and the whole thing felt so right I just couldn't say no.


It all started with the world's simplest shortbread crust, which was an absolutely joy to throw together. Even though the whole thing came together so quickly, I still can't stop flipping out at the incredible snap this crust had, days after the bars had been baked.

And yes, that's right, I said days. This is one of those amazing recipes that only get better in the days after you bake it--the cheesecake texture improves, the caramel flavors meld into the creamy layer, the crust becomes even more divine beneath it all. They go down waaaay too easy. Especially considering that this recipe yields enough cheesecake bars to feed an army and one is expected to revamp one's diet on January 1st. Aw, well. There's always next year.


Dulce de Leche Cheesecake Bars
Adapted from Alice Medrich's Chewy, Gooey, Crispy, Crunchy, Melt-in-Your-Mouth Cookies

For the cheesecake layer, I found it needed more sugar to suit my taste than the original recipe called for, so I added another 2 tablespoons and have made the change in this adapted recipe.


I used dulce le leche here, but any good store-bought caramel sauce (or homemade, for that matter) will work just fine. If at all possible, make these the day before you're going to serve them--the texture of the cheesecake just keeps getting better and better as it sits in the fridge.

Makes 2-3 dozen, depending on size

For the crust:

14 tablespoons unsalted butter, melted and still warm
1/2 cup sugar
2 teaspoons pure vanilla extract
1/2 teaspoon salt
2 cups all-purpose flour

For the dulce de leche swirl:

1/2 cup dulce de leche (see note)
1/8 teaspoon salt

For the cheesecake layer:

1 1/2 pounds cream cheese, at room temperature
6 tablespoons sugar
1 1 /2 teaspoons pure vanilla extract
2 large eggs, at room temperature


Being by making the crust: Position a rack in the lower third of the oven and preheat it to 350 degrees. Line a 9x13-inch baking pan completely with foil, folding the excess over the sides.

In a medium bowl, mix together the melted butter, sugar, vanilla and salt. Add the flour and mix just to combine--the dough will be soft, and might be somewhat oily, that's okay. Press the dough evenly across the bottom of the prepared pan. Bake for about 20-25 minutes, or until the crust is golden brown, with the edges being slightly darker than the center. Let cool on a wire rack.

While the crust is cooling, prepare the rest of the recipe. Lower the oven temperature to 325 degrees. Stir together the dulce de leche with the salt and set aside.

In the bowl of an electric mixer, beat the cream cheese until smooth and creamy on medium speed. Beat in the sugar and vanilla. Beat in the eggs one at a time. Scrape down the bowl well and give it a final beating until the batter is completely smooth and well-blended. Stir 2 tablespoons of the cheesecake batter into the salted dulce de leche.

Pour the remaining cheesecake batter over the cooled crust. Dollop the dulce de leche mixture over the cheesecake batter, leaving plenty of cheesecake batter in between. Using a butter knife, and being careful not to scrape the crust, swirl the dulce de leche into the cheesecake batter in small loopy circles until the surface is nicely marbled. Bake for 20-30 minutes, or until the filling is puffed but still jiggles like Jell-O when the pan is nudged.

Set the pan on a cooling rack and let cool completely. Refrigerate for at least 4 hours but preferably 24 hours before cutting into squares and serving. Keep any leftovers refrigerated in an airtight container for up to 4 days.
»»  READMORE...

Are you feeling recharged and energized this New Year, ready to take on those long-procrastinated-about fitness goals? Determined to revamp your diet? Buying all those magazines with headlines like "Get Fit in 2011!" to help propel you along your healthy eating and exercise plan?

Nah, me neither.

But I can offer you this: A few recipes that are delicious, satisfy the sweet tooth and the urge to create in the kitchen, while not adding to the real estate in your pants. Not "diet" food by any means, but certainly not as naughty as most recipes around here, and no Splenda to be found. Because sometimes it feels good to eat something with a little less vavoom in the dreaded calorie department. Enjoy!

Oh, and speaking of less naughty recipes, what are some of your "lighter" favorites?

Virtuous Strawberry Mousse. Up there at the top of this post. So light and lovely, it will make you feel like a lady again after all that holiday bourbon-drinking. Or is that just me I'm talking about?


Rocky Road Rice Crispy Treats. Decadent without a whole lotta calorie craziness. Good for those "I really need chocolate lest I rip my husband's face off" sort of cravings while you're trying to cut back a little.


Glazed Clementine Chiffon Cake. A great use for all those Clementines you bought for "healthy snacking". Schaa.


Chocolate Tweed Angel Food Cake. With or without whipped cream, it's so pretty, so satisfying. Good luck not putting the whole thing in your face.


Mom's Cheesecake. One of my all-time favorite desserts. And when you swap out full-fat cream cheese and sour cream for light, it's positively harmless. Yes, you can use calorie-free sweeteners here, too, but don't tell me about it.


Banana Chocolate Chip Cookies with Candied Ginger. I still sort of can't believe how little butter is in this recipe.


Everyday Cookies. The perfect thing to always have in the cookie jar. Also great for snacky kids who are a real bore when all hopped up on sugar.


Baked Cinnamon-Sugar Doughnuts. I was gobsmacked at how good these were and how non-gypped I felt in terms of a doughnut experience. Eat them warm for best results.


Strawberry Angel Pavlovas. I think this dessert might be part of my Last Meal on Earth. So dreamy.


Nubbly Bran Muffins with Golden Raisins and Cranberries. Nothing wrong with something tasty and actually good for you for breakfast.


Piece of Cake Granola. Even more deliciousness to start your day out right. You know, before you fall off the wagon at 3:00 in the afternoon.
»»  READMORE...

Happy New Year, darling readers!

I hope everyone had an awesome time ringing in 2011, and that you did something spectacular that involved a fancy outfit and lots of expensive cocktails. If so, the look you see on my face right now is one of puzzled wonderment--I do hope you'll tell me what that was like. I was at home, in stretchy pants, eating caramel cheesecake bars (more on those in the coming days, I promise). But don't worry about my waning inner party girl--I was taking in plenty of ice-cold Champers while I waited for the ball to drop and thought about how I was going to justify posting about something involving fruitcake a full week after Christmas. Do I know how to party or what?!

Here's the thing: I don't know what you're resolving to accomplish in the New Year, but I can be pretty sure that all of us are trying to be a little less wasteful these days, either because it's fantastically trendy or because of the mounting guilt of realizing how much food we actually toss in a given day. For me, its the latter; I've really been trying to use my culinary creativity to really use as many odds and ends that I find in my cupboards and fridge as humanly possible. The terrific thing about these Fruitcake Cookies is that I'm willing to bet that after a month full of holiday baking, cooking and being given random gifts of holiday-ish food, you probably have nearly all the ingredients needed to make these cookies in your possession right this second. Just the thing to get you through the dreary month of January.


You might remember a couple weeks back that I threw out the idea of making your own candied cherries. Well, the inspiration for doing so came the first time I made these cookies as gifts in early December. With the sort of good fortune and forethought that so rarely strikes a woman who spends her days reading aloud Pinkalicious books, warding off tantrums and halving grapes, I made extra candied cherries just in case I was moved to make a second batch of these cookies for sport. And hot damn--these cookies were so utterly surprising in their buttery, slightly sandy texture, pop of boozy fruit and soft spark of clove, I indeed ended up making a second batch. In a season of baking fury, that's really saying something, don't you think?


The best part about this cookie is its riff-ability, which is to say you can have the fruit and nut mixture consist of just about anything you have on hand. Use up all those bits and pieces of raisins, dried fruits, nuts, chocolate chips, etc., that you might have rattling about in your cabinets. Soak them in a bit of honey, lemon and sherry if you have it, but I don't see why you couldn't use brandy, dark rum or cognac instead. Whatever combination you come up with, I'm sure it will be dynamite. If ever there was a sleeper cookie hit of the winter, I'd have to say this would be it.


Fruitcake Cookies
Adapted from Ina Garten

This is the perfect sort of cookie to make a full batch of, wrap both logs of dough, and slice and bake just one log at a time. Or bake off just a few cookies at a time, for that matter. Steep the fruit and nut mixture overnight before mixing it into the dough, or use my heating instructions to speed things up.

For the fruit and nut mixture:

1/2 pound dried figs, stemmed and coarsely chopped
1/4 pound raisins, dark or golden
2 ounces candied cherries, coarsely chopped
2 ounces dried apricots, coarsely chopped
1 tablespoon honey
2 tablespoons dry sherry
1 tablespoon freshly squeezed lemon juice
6 ounces chopped pecans
Pinch of salt

For the cookies:

2 2/3 cups all-purpose flour
1/4 teaspoon kosher salt (or a generous 1/8 teaspoon table salt)
1/2 pound (2 sticks) unsalted butter, at room temperature
1/2 teaspoon ground cloves
1/2 cup sugar
1/3 cup light brown sugar, firmly packed
1 large egg

In a medium bowl, combine the figs, raisins, cherries, apricots, honey, sherry, lemon juice, pecans, and a pinch of salt. Cover the bowl with plastic wrap and heat in the microwave on high for 3-4 minutes, or until the mixture is hot and the raisins have begun to plump up. Ensure the bowl is tightly covered with plastic wrap, and let sit for 30 minutes. Alternatively, you can skip the microwaving step and let the fruit steep at room temperature overnight.

In the bowl of an electric mixer fitted with the paddle attachment, cream the butter, ground cloves, sugar, and brown sugar on medium speed until smooth, about 3 minutes. With the mixer on low speed, add the egg and mix until incorporated. With the mixer still on low, slowly add the flour and 1/4 teaspoon salt just until combined. Stir in the fruits and nuts, including any liquid in the bowl. Divide the dough in half. Shape each half into a log (circular or square-shaped), each about 12 inches long. Refrigerate the dough for several hours, or until firm.

When you're ready to bake, position oven racks to the upper and lower thirds of the oven and preheat it to 350 degrees.

With a small, sharp knife, cut the logs into 1/2-inch-thick slices, making about 2 dozen cookies out of each log. Place the slices 1/2-inch apart on the prepared pans (you can fit 2 dozen on each sheet--they don't spread much while baking) and bake for 20-22 minutes, or until mostly firm and lightly golden on the very edges. Cool on the baking sheets for a few minutes before transferring to wire racks to cool completely.
»»  READMORE...