Tampilkan postingan dengan label Cookies. Tampilkan semua postingan

Ingredients

  • 1 1/2 cups butter, softened
  • 2 cups white sugar
  • 4 eggs
  • 1 teaspoon vanilla extract
  • 5 cups all-purpose flour
  • 2 teaspoons baking powder
  • 1 teaspoon salt

Directions

  1. In a large bowl, cream together butter and sugar until smooth. Beat in eggs and vanilla. Stir in the flour, baking powder, and salt. Cover, and chill dough for at least one hour (or overnight).
  2. Preheat oven to 400 degrees F (200 degrees C). Roll out dough on floured surface 1/4 to 1/2 inch thick. Cut into shapes with any cookie cutter. Place cookies 1 inch apart on ungreased cookie sheets.
  3. Bake 6 to 8 minutes in preheated oven. Cool completely.
»»  READMORE...


Ingredients

  • 4 cups confectioners' sugar
  • 1/2 cup shortening
  • 5 tablespoons milk
  • 1 teaspoon vanilla extract
  • food coloring

Directions

  1. In a large bowl, cream together the confectioners' sugar and shortening until smooth. Gradually mix in the milk and vanilla with an electric mixer until smooth and stiff, about 5 minutes. Color with food coloring if desired.
»»  READMORE...


Ingredients

  • 3/4 cup all-purpose flour
  • 1/2 teaspoon baking soda
  • 1/4 teaspoon baking powder
  • 1/2 teaspoon salt
  • 1/2 cup butter, softened
  • 1/2 cup peanut butter
  • 1/2 cup white sugar
  • 1/2 cup packed light brown sugar
  • 1 egg
  • 1 teaspoon vanilla extract
  • 1 cup quick cooking oats
  • 3 tablespoons butter, softened
  • 1 cup confectioners' sugar
  • 1/2 cup smooth peanut butter
  • 2 1/2 tablespoons heavy whipping cream

Directions

  1. In a large bowl, cream together 1/2 cup butter or margarine, 1/2 cup peanut butter, white sugar, brown sugar, and vanilla. Add egg and beat well.
  2. In another bowl, combine the flour, baking soda, baking powder, and salt. Add these dry ingredients to the creamed mixture. Stir. Add oatmeal and stir.
  3. Drop by teaspoons onto greased baking sheet, and press each mound down with a fork to form 1/4 inch thick cookies. Bake at 350 degrees F (175 degrees C) for 10 minutes, or until cookies are a light brown.
  4. To Make Filling: Cream 3 tablespoons butter or margarine with the confectioners' sugar, 1/2 cup smooth peanut butter, and the cream. Spread filling onto half of the cooled cookies, then top with the other half to form sandwiches.
»»  READMORE...
If ever there were a way to categorize Chewy Lemon Gumdrop Cookies, I'd venture to say they'd be in league with some of the world's Ultimate Happy Things. See also: baskets full of kittens, Hello Kitty stickers, baby shoes, rolling meadows full of sunshine, soft grass and wildflowers. Really, guys, cookies don't come much more cheery than these little gems. Lemon! Sugar! Candy! Cookies! This could only get more fun if we were eating them at a slumber party while braiding each other's hair.

I first started thinking about putting gumdrops in a cookie after I had some positively addictive ones that Stacie contributed to our recent bakesale. Hers had oatmeal and soft spice and strictly used orange gumdrops, but I couldn't stop marveling about the whole thing--it was a candy-cookie hybrid, a celebration of chew. I was hooked. I knew I wanted to rework the idea in some way, but seeing as I'm sort of short on time to work on recipes that don't have a deadline, I figured I'd bookmark the idea in my increasingly feeble mental file and wait for inspiration to strike at a later date.


Well. Inspiration indeed struck, in the beautiful sort of slap-yo'-mama way that the best ideas so often do. One morning last week, I had actually managed to drop Little C off at school at a time that wasn't considered late, and thought I'd cruise through the nearby Trader Joe's to pick up a few things for dinner.

So if you've ever been to a Trader Joe's, you know that it's equal parts Kingdom of Awesome, Den of Little Personal Space and Spiral of Shopping Cart Traffic Hell. But as it turns out, at a few minutes before 9:00 a.m., it's sort of a ghost town, and therefore akin to a spa day for a food geek. I strolled the aisles, childless and with great leisure, murmuring to myself when I came upon a particularly interesting item. I loaded my cart with approximately 110 more things than I'd intended. I was having a glorious Trader Joe's experience.

As I approached the checkout line, I perused the little kiosks of insanely delicious impulse buys that live near the registers. And like a beacon of confectionery hope, there it was, practically singing and waving to me--a glossy, adorable little package of citrus gumdrops. Pink grapefruit, tangerine, key lime and lemon. They would be tucked into a soft, chewy sugar cookie heavily scented with lemon. I added the package of gumdrops to my pile of wasabi peas, savory rice crackers, string cheese and dirt cheap organic apples and deemed it so. Happy, happy, happy.


Chewy Lemon Gumdrop Cookies

I used Trader Joe's Citrus Gumdrops for these cookies, but any fruit-flavored drops will do. If the drops are on the smaller size, halve them. If they're the larger ones, cut them in quarters or smaller. After cutting the drops, toss them in a small amount of granulated sugar just to prevent them from sticking together.

Let these cookies cool completely before serving--piping hot gumdrops rival pizza cheese burn.

I'm a stickler for using organic lemons when zesting them for cooking or baking. But that's just how I roll.

Makes about 2 1/2 dozen

2 1/4 cups all-purpose flour
1 teaspoon baking soda
3/4 teaspoon salt
1 cup sugar
Zest of 2 lemons
1 cup (2 sticks) butter, at room temperature
1 teaspoon pure vanilla extract
2 large eggs
1 cup small gumdrops, halved and tossed in sugar (see note)

Position oven racks to the upper and lower thirds of the oven and preheat it to 375 degrees. Line two baking sheets with parchment paper or silicone baking mats.

Sift together the flour, baking soda and salt into a medium bowl.

Place the sugar in a small bowl with the lemon zest. Use your fingertips to work the zest into the sugar until the sugar is moistened and fragrant.

In the bowl of an electric mixer, beat the butter until soft and creamy on medium high speed. Beat in the lemon sugar and vanilla extract until light and fluffy, about 2 minutes. Beat in the eggs. Scrape down the bowl. Set the mixer on low and gradually stir in the dry ingredients. When just a few streaks of flour remain, stir in about three-quarters of the gumdrop pieces.

Using a small scoop or two spoons, portion the dough into balls, 2 tablespoons each. Place the dough balls on the baking sheets about 4 inches apart, or about 8 to a standard sized baking sheet (the cookies will spread). Dot a few of the remaining gumdrop pieces artfully atop each dough ball. Bake until the edges are lightly golden and the centers are still pale, 10-11 minutes. Let cool on the baking sheet for a minute before transferring the cookies to a wire rack to cool completely before serving.
»»  READMORE...
I don't know what's going on, guys. But I have been in one of those zones where I am in Taking On the World Mode. There has to be some kind of groovy, planetary thing that's propelling this insanity, because I'm suddenly all about Next Level Stuff over here. Like taking the leap to "big'gerl underwearz" (for Little C, not me, pervs!) the same week as finding out that I'm taking on some new projects that simultaneously thrill and terrify me (I will tell more as soon as I'm sure I won't get sued for it, I promise!). This is all on top of getting super close to Go Time for the fabulous San Francisco Food Bloggers' Bake Sale. Also, Royal Wedding fever? I've totally come down with it. True.

But in spite of all the crazy, I am here, because I love you and I can't stay away. Also, one of those aforementioned Next Level Things was devising a way to transport the humble chocolate chip cookie to a different dimension and, well, I just couldn't hide this light under a bushel, people. This is Important News (jazz hands).

So last week, right about the same time that the words "potty" and "big girl panties" started being used in high-pitched questions way too often in our household, my beloved brother-in-law came for a short visit. The brother-in-law who, along with my sister, will be chiefly responsible for my child thinking her own parents are seriously, helplessly uncool. He was on his way through town to play a few shows here in San Francisco, and I couldn't send him back on the road without cookies and candy, naturally. You know how that whole thing goes.

The plan was just to go with good old chocolate chip cookies--no fancy cookie pants, just traditional, chocolate-chipped love. I had all the ingredients in the house, things were looking easy peasy. Until I tapped into those Next-Level Urges I was telling you about earlier. They're insatiable, I'm telling you. I know, I don't know EITHER. But I suddenly decided a regular chocolate chip cookie was totally Current Level and therefore simply would not do.

So the goal was to create a twist on the classic, here. I mean, I wasn't trying to get all molecular gastronomy on Toll House or anything. I just wanted to see how much flavor and texture play could happen, just by preparing things a little differently.

This is how it all goes go down. Hack up a bunch of chocolate chips (if you've got a few odds and ends of bars and almost-empty bags of chips in your cupboards, even better), breaking some up just a little, creating lots of little shards out of the rest. You're going for a sort of chocolate tweed here, with the occasional hunk.

Next comes the butter. Melted and browned, then frozen solid again. Let it sit out on the counter for a few minutes to soften up just enough that it can be creamed with the sugars. Can I just say that I always die a little from the gorgeous nutty scent of browned butter? If I could marry a smell, browned butter would be it. That is all.


The other little je ne sais quoi flavor bumper here is a dash of almond extract with the vanilla. Man, oh man, how I love almond extract. It's so great at giving things a little boost of "Huh! What's that?", know what I mean? It's genius in buttercreams, batters and doughs of all sorts. Here, it also played well with the nuttiness of the browned butter, so that's a win-win-WIN sort of situation, I'd say.

Overall, the finished cookies had everything any self-respecting person loves about classic chocolate chip cookies--buttery, sugary, crisp, a bit tender just at the center, loads of chocolate. More than one band member proclaimed they were the best chocolate chip cookies they'd ever had, and I don't just think it's because they'd been travelling in a band van for a couple weeks. I'm telling you, these are like Illuminated Chocolate Chip cookies. Just different enough to blow minds. It's like if you went out on your normal Girls Night Out karaoke excursion and then Prince William showed up. And then you fell in love and then you became the Princess of Wales. I told you, I have Royal Wedding fever! But I didn't tell you that I have nothing against being somebody's second wife. Just saying.


Illuminated Chocolate Chip Cookies

I love using a mix of chocolate chips for these cookies--bittersweet, milk and semi-sweet--but use whatever sounds good to you.

Makes 4 dozen

1 cup (2 sticks) unsalted butter, cut into 1-inch pieces
2 1/4 cups all-purpose flour
1 teaspoon baking soda
1 teaspoon salt
3/4 cup granulated sugar
3/4 cup firmly packed dark brown sugar
1 1/2 teaspoons vanilla
Scant 1/2 teaspoon almond extract
2 large eggs, at room temperature
1 1/2 to 2 cups bittersweet chocolate chips (or a combination of different kinds of chips), roughly chopped into hunks and shards (see note)

Place the butter in a medium saucepan over medium high heat. Melt and cook the butter over until it is browned and smells nutty, swirling the pan occasionally, about 6 minutes. Listen closely--as soon as the butter stops sizzling and popping, you are seconds away from perfectly browned butter. Pour the browned butter into a small metal pan. Freeze until the butter is completely solid, about 15 minutes. Remove the pan from the freezer and let it sit at room temperature for about 10-15 minutes.

In a large bowl, sift together the flour, baking soda and salt.

Place the sugars and extracts in the bowl of an electric mixer fitted with the paddle attachment. Scrape the browned butter out of the pan in hunks and place them in the mixer bowl. Beat the butter, sugars and extracts together until smooth, light and fluffy, about 3 to 4 minutes (depending on how cold the butter is when you put it in the bowl, it may take a minute or two longer). Scrape down the bowl and beat in the eggs one at a time. Reduce the mixer speed to low and gradually stir in the flour. Stir in the chocolate bits by hand. Cover the bowl tightly with plastic wrap and chill for at least an hour, or up to 2 days.

When you're ready to bake, position the oven racks to the upper and lower thirds of the oven and preheat it to 350 degrees. Line two baking sheets with parchment paper or silicone baking mats. Scoop the dough into 1-tablespoon-sized balls and place them on the baking sheets, 12 to a sheet. Bake until golden brown, about 13 to 15 minutes, rotating the sheets top to bottom and front to back halfway through baking. Let the cookies cool for a minute before transferring them to wire racks to cool completely. Repeat with the remaining dough. Store in an airtight container at room temperature.
»»  READMORE...

This Valentine's Day, I urge you to forgo the typical. Fine wine, fragrant roses, silky chocolates, intense passion? Snore. Boring! Where's your sense of adventure, people? Your fire, your moxie?! It's in the form of a recipe that is so wacky that it works, that's where.

Hard Candy Cookies. Because I'm coming up short on ways to express that you need to try this recipe right now even though it doesn't have chocolate.


I can't really explain how the idea first came to me, guys. But I had big dreams one particular day in the Piece of Cake kitchen. Dreams that involved producing a certain kind of cookie, something that would at once be buttery and crisp, but with teeny bits of chew tucked within. It could have been my ongoing mourning of Archway's Cherry Chip Nougat Cookies, which sadly no longer exist (holler if you hear me!), but more likely it was just that sort of mad scientist feeling that tends to grab a baker every now and again. And so it came to be--bashed-up cherry hard candies mixed into a sort of shortbread cookie dough. I know, right?!


What turned out to be really awesome about this recipe is the way all the elements played together in the oven. The cherry flavor of the candy really permeates the whole cookie without having to use any other flavorings (though you most certainly could bump up the cherry flavor a bit with an extract if you have one), and the candy bits just sort of melt into the cookie in places, while staying intact in others, which makes for the most phenomenal texture here. It's downright addictive, for real.

When the cookie cools and the candy bits settle into their new forms, some parts end up chewy, while others pack a crunch. It's a sort of candylike cookie, and I just can't think of too many things more delightful that that.


The cookies are topped off with a roll in some powdered sugar, which gives them an almost iced finish. Altogether it's like a Mexican Wedding Cookie-meets frosted sugar cookie-with a little howdoyado at the candy shop. I know, I'm flailing here. Just make these, and soon. You won't regret it.

Hard Candy Cookies

As you may have guessed, using cherry candies here is just a starting point. Lime, lemon, or a mixture of colored candies all sound delightful. Bump up the fruit flavor if you wish with a coordinating extract. Use just enough food coloring to color the dough slightly, but depending on the candies you use, extra color may not be necessary.

Makes about 2 dozen

1 1/4 cups all-purpose flour
1/4 teaspoon kosher salt (or 1/8 teaspoon table salt)
2 1/2 ounces cherry-flavored hard candies, crushed (about 1/3 cup crushed candy)
1/2 cup (1 stick) unsalted butter, at room temperature
1/2 cup confectioners' sugar
1/2 teaspoon pure vanilla extract
Red gel food coloring, optional

1/3 cup sifted confectioners' sugar, for finishing the cookies


In a medium bowl, whisk together the flour, salt and crushed candies. Set aside.

In the bowl of an electric mixer fitted with the paddle attachment, beat together the butter and confectioners' sugar on medium speed until light and fluffy. Beat in the vanilla. Reduce the speed to low and stir in the flour mixture. Increase the speed to medium and mix until the dough comes together. If it still looks dry and crumbly, add a teaspoon or so of water and it should quickly come together. If you want to bump up the pink color of the cookies a bit, add a drop or two of food coloring.

Line a baking sheet with parchment paper or a silicone baking mat (don't skip this lest you won't be able to get the cookies off the baking sheets because of the melted candy bits). Using a small ice cream scoop or two spoons, scoop out level tablespoons of the dough, then roll into balls and place them on the baking sheet.

Chill the dough balls for 30 minutes in the refrigerator while you preheat the oven to 325 degrees. When the dough has chilled, bake until they're just beginning to turn golden around the edges, about 22-25 minutes. Let cool for a minute on the baking sheet before transferring to a wire rack to cool completely.

To finish the cookies, place the remaining 1/3 cup confectioners' sugar in a medium bowl. Working a few cookies at a time, roll them in confectioners' sugar and then place them in a sieve. Shake the sieve over the bowl of confectioners' sugar to dust off any excess. Repeat until all the cookies are dusted with sugar. Store in an airtight container at room temperature for up to 5 days.
»»  READMORE...

Happy New Year, darling readers!

I hope everyone had an awesome time ringing in 2011, and that you did something spectacular that involved a fancy outfit and lots of expensive cocktails. If so, the look you see on my face right now is one of puzzled wonderment--I do hope you'll tell me what that was like. I was at home, in stretchy pants, eating caramel cheesecake bars (more on those in the coming days, I promise). But don't worry about my waning inner party girl--I was taking in plenty of ice-cold Champers while I waited for the ball to drop and thought about how I was going to justify posting about something involving fruitcake a full week after Christmas. Do I know how to party or what?!

Here's the thing: I don't know what you're resolving to accomplish in the New Year, but I can be pretty sure that all of us are trying to be a little less wasteful these days, either because it's fantastically trendy or because of the mounting guilt of realizing how much food we actually toss in a given day. For me, its the latter; I've really been trying to use my culinary creativity to really use as many odds and ends that I find in my cupboards and fridge as humanly possible. The terrific thing about these Fruitcake Cookies is that I'm willing to bet that after a month full of holiday baking, cooking and being given random gifts of holiday-ish food, you probably have nearly all the ingredients needed to make these cookies in your possession right this second. Just the thing to get you through the dreary month of January.


You might remember a couple weeks back that I threw out the idea of making your own candied cherries. Well, the inspiration for doing so came the first time I made these cookies as gifts in early December. With the sort of good fortune and forethought that so rarely strikes a woman who spends her days reading aloud Pinkalicious books, warding off tantrums and halving grapes, I made extra candied cherries just in case I was moved to make a second batch of these cookies for sport. And hot damn--these cookies were so utterly surprising in their buttery, slightly sandy texture, pop of boozy fruit and soft spark of clove, I indeed ended up making a second batch. In a season of baking fury, that's really saying something, don't you think?


The best part about this cookie is its riff-ability, which is to say you can have the fruit and nut mixture consist of just about anything you have on hand. Use up all those bits and pieces of raisins, dried fruits, nuts, chocolate chips, etc., that you might have rattling about in your cabinets. Soak them in a bit of honey, lemon and sherry if you have it, but I don't see why you couldn't use brandy, dark rum or cognac instead. Whatever combination you come up with, I'm sure it will be dynamite. If ever there was a sleeper cookie hit of the winter, I'd have to say this would be it.


Fruitcake Cookies
Adapted from Ina Garten

This is the perfect sort of cookie to make a full batch of, wrap both logs of dough, and slice and bake just one log at a time. Or bake off just a few cookies at a time, for that matter. Steep the fruit and nut mixture overnight before mixing it into the dough, or use my heating instructions to speed things up.

For the fruit and nut mixture:

1/2 pound dried figs, stemmed and coarsely chopped
1/4 pound raisins, dark or golden
2 ounces candied cherries, coarsely chopped
2 ounces dried apricots, coarsely chopped
1 tablespoon honey
2 tablespoons dry sherry
1 tablespoon freshly squeezed lemon juice
6 ounces chopped pecans
Pinch of salt

For the cookies:

2 2/3 cups all-purpose flour
1/4 teaspoon kosher salt (or a generous 1/8 teaspoon table salt)
1/2 pound (2 sticks) unsalted butter, at room temperature
1/2 teaspoon ground cloves
1/2 cup sugar
1/3 cup light brown sugar, firmly packed
1 large egg

In a medium bowl, combine the figs, raisins, cherries, apricots, honey, sherry, lemon juice, pecans, and a pinch of salt. Cover the bowl with plastic wrap and heat in the microwave on high for 3-4 minutes, or until the mixture is hot and the raisins have begun to plump up. Ensure the bowl is tightly covered with plastic wrap, and let sit for 30 minutes. Alternatively, you can skip the microwaving step and let the fruit steep at room temperature overnight.

In the bowl of an electric mixer fitted with the paddle attachment, cream the butter, ground cloves, sugar, and brown sugar on medium speed until smooth, about 3 minutes. With the mixer on low speed, add the egg and mix until incorporated. With the mixer still on low, slowly add the flour and 1/4 teaspoon salt just until combined. Stir in the fruits and nuts, including any liquid in the bowl. Divide the dough in half. Shape each half into a log (circular or square-shaped), each about 12 inches long. Refrigerate the dough for several hours, or until firm.

When you're ready to bake, position oven racks to the upper and lower thirds of the oven and preheat it to 350 degrees.

With a small, sharp knife, cut the logs into 1/2-inch-thick slices, making about 2 dozen cookies out of each log. Place the slices 1/2-inch apart on the prepared pans (you can fit 2 dozen on each sheet--they don't spread much while baking) and bake for 20-22 minutes, or until mostly firm and lightly golden on the very edges. Cool on the baking sheets for a few minutes before transferring to wire racks to cool completely.
»»  READMORE...

To begin with a disclaimer, which is probably the worst way ever to start a conversation, I should say that I am well aware of the polarizing effects of coconut. But whether or not you are on Team Coconut, I need to tell you about this cookie, because it emerged from the oven like a beacon of hope after another coconut sugar cookie recipe I'd tried the day before had failed me so. In fact, I don't think I'd ever been so offended by a cookie in my entire life.

After I'd chucked the first recipe's printout in the compost along with all of its unfortunate results, I was hellbent on making a seriously terrific coconut sugar cookie all on my own. And with the magic of Christmas, cookie tragedy gave way to inspiration and an awesome Coconut Sugar Cookie. I just love stories of First World problems leading to marginally important successes, don't you?


For those of you firmly on Team Coconut, I don't think you'll find another celebration of coconut in cookie form out there quite like this. Not only are we dealing with coconut extract to bump up the flavor, we've got ourselves shredded coconut in two forms, and a dreamy coconut milk icing. It's enough to send you to the islands in the dead of winter, I'm telling you.

The base recipe for this cookie is my beloved Heirloom Sugar Cookies, the sugar cookie of my youth, the one I perch on a pedestal above all others. Partly because of its buttery, airy and generally addictive qualities, and mostly because it's a recipe from my Gramma, from whom all delightful things come. To create a coconut sugar cookie divine enough to erase from my mind and palate the horrible nuggets of unleavened suntan oil that came from my first attempt, I figured starting with a perfect recipe was a good idea.

And dang, I was right, y'all! It's a Christmas miracle!


Coconut Sugar Cookies

Dessicated coconut can be found in any health food or natural foods store. Look for regular, full fat coconut milk for the icing (not "light" or "lite" coconut milk) in the Asian foods aisle.

You can scoop the dough out for baking immediately after mixing, or if you wish to store it longer, turn the dough out onto a large sheet of plastic wrap, patting the dough gently into a disc and wrapping it well before refrigerating or freezing.


Sanding sugar is a coarse, sparkly sugar found in kitchen and baking supply stores. Its endlessly useful for decorating and gives these cookies a pretty sparkle and a nice crunch. If you can't find it, just skip it, or try a smaller amount of granulated sugar instead.


Makes about 3 dozen

2 1/2 cups all-purpose flour
1/4 cup dessicated coconut
1/2 teaspoon baking soda
1/2 teaspoon cream of tartar
1/4 teaspoon salt
1/2 cup (1 stick) unsalted butter, at room temperature
1/2 cup granulated sugar
1/2 cup confectioners' sugar
1/4 cup vegetable oil
1 large egg, at room temperature
1 teaspoon pure vanilla extract
1/2 teaspoon coconut extract

For the icing and decoration:

2 cups confectioners' sugar
1/4 cup coconut milk
Pinch of salt
1 cup shredded, sweetened coconut
2 tablespoons white sanding sugar

Position oven racks in the upper and lower thirds of the oven and preheat it to 350 degrees. Line two baking sheets with parchment or silicone baking mats.

Whisk together the flour, dessicated coconut, baking soda, cream of tartar and salt in a medium bowl. Set aside.

Whisk together the oil, egg, vanilla and coconut extracts in a small bowl.

In the bowl of an electric mixer fitted with the paddle attachment, beat together the butter and sugars until fluffy and pale in color, about 2 minutes.

Beat the egg mixture into the butter and sugar mixture on medium speed until well-blended. Scrape down the bowl and reduce the mixer speed to low. Gradually stir in the flour mixture until all the dry ingredients are incorporated. The dough will be very soft.

Using a 1-tablespoon-sized scoop, portion the dough into balls into the prepared baking sheets, 12 to a sheet. Pour about 1/4 cup of granulated sugar onto a plate. Dip the back of a measuring cup or the flat bottom of a glass into the sugar, and press onto each dough ball lightly to flatten each to about 1/4-inch thick, dipping the cup or glass again before pressing each cookie.

Bake the cookies until they are lightly golden and crisp at the edges, about 12 minutes, rotating the sheets from front to back and top to bottom about halfway through baking. Let the cookies cool in the sheets for a minute before transferring them to a wire rack to cool completely.

When the cookies have cooled, whisk together the confectioners' sugar, coconut milk and salt in a small bowl. Toss together the shredded coconut and sanding sugar on a plate. Spread each cookie evenly with icing and sprinkle generously with the sugared coconut. Let the icing dry for about an hour before serving. Store in an airtight container for up to 1 week (the cookies will soften a bit after the first day).
»»  READMORE...

Ooooh, you guys! I really hope I'm getting to you in time. Like before you get all set in your holiday baking plans. Because let me tell you what. These peppermint meringues? With their minty crunch, melting sweetness and slick of bittersweet chocolate? They need to be all up in your holiday cookie tins. I mean, just look at them in their jaunty striped suits. They will delight any recipient and call to you from the countertop. So says the person who's had meringue crumbs all down her shirt for three days straight.


I can't think of too many phrases more lovely than "Christmas confections", can you? Well, I suppose there's also "French meringue", which I also have a thing for. And "spatula", but that's neither here nor there. But about the French meringue. It's my favorite kind to make and eat. Oh, of course I love a pillowy, soft meringue atop a pie or the in-between kind that's baked crisp on the outside with a marshmallow-y interior, like with a heavenly pavlova. But I'm totally enamored with the kind of hard-throughout meringue cookie that has you cronch-cronch-ing while it simulatneously melts in your mouth. And I'll tell you what else--it's dang hard to find a good, reliable recipe for that sort of thing.


This recipe is a far cry from a hard-core, classic French meringue (granulated and confectioners' sugar? Flour? Mon dieu!), but the technique is every bit as simple. The little trick that makes these baked meringues so featherweight and addictively melt-in-your-mouth is the folding in of the confectioners' sugar and a touch of flour, after the bulk of the superfine granulated sugar has been whipped into the egg whites. And can I just say that when I grind granulated sugar in my coffee grinder to make superfine sugar and then pour it into a plastic bag to store it, I always get the biggest laugh out of how questionable the whole thing looks?

If you wondered if I was a square before, well, I guess I cleared that one up for you.


But in addition to being a total square, I am also quite crafty, and after deciding to make these meringues peppermint, opted to dress them up even more by painting long stripes of red food coloring up the sides of a piping bag before filling it. As you pipe out the meringue, you'll get a sweet little pattern on each cookie. Super stylish and cute! Unlike me with all these crazy meringue crumbs on my shirt.


Chocolate-Dipped Peppermint Meringues

To make superfine sugar, take regular granulated sugar for a spin in a clean coffee grinder or food processor fitted with the steel blade.

When you add the peppermint extract, the minty fragrance and flavor may seem a bit overpowering, but it will be tempered by adding the remaining sugar mixture, and some of its minty power will bake off during the long baking time, too.


Gel food coloring is available at any good baking supply store and many craft stores. It's much thicker and much more intense in color than the liquid food coloring sold in supermarkets.
You can forgo the jazzy striping altogether and just beat in a touch of festive food coloring with the extracts if you prefer.

Makes about 4-5 dozen, depending on size

4 large egg whites (about 4 ounces), at room temperature
1/4 teaspoon cream of tartar
Pinch of salt
3/4 cup superfine sugar (see note)
1/2 teaspoon pure vanilla extract
1/4 teaspoon peppermint extract
1 cup confectioners' sugar
1 tablespoon all-purpose flour
Red gel food coloring
8 ounces bittersweet chocolate chips (I like Ghiradelli)

Position the oven rack to the upper and lower thirds of the oven and preheat it to 250 degrees. Line two baking sheets with parchment paper or silicone baking mats.

Sift together 2 tablespoons of the superfine sugar, the confectioners' sugar, and the flour into a medium bowl. Set aside.

In the bowl of an electric mixer fitter with the whip attachment, combine the egg whites, cream of tartar and salt. Whip first on medium speed, gradually increasing the speed to high, until the egg whites reach soft peaks. Gradually rain in the remaining superfine sugar. Continue to whip until the meringue is glossy and holds a very stiff peak. Beat in the vanilla and peppermint extracts.

Remove the bowl from the mixer. With a large spatula, gently and carefully fold in the remaining sugar mixture by hand in three additions, taking care not to deflate the egg whites.

On the inside of a piping bag fitted with a large star tip, use a long, thin paint brush to paint four or five long stripes of food coloring up the sides of the bag. Carefully transfer the meringue to the piping bag, aiming for the center of the bag as much as possible to avoid smudging the stripes. Pipe out the meringue into cookies about 1 1/2 inches in diameter onto the prepared baking sheets.

Place both sheets into the oven at once, and immediately turn the oven temperature down to 200 degrees. Bake until the cookies are completely firm and dry, about 1 hour and 45 minutes. Remove from the oven and allow the cookies to cool completely.

Melt the chocolate chips on a double boiler or in the microwave on high power in 30 second intervals until smooth, stirring after each interval. Dip the bottoms of the cookies in the melted chocolate and place them on parchment-lined baking sheets. when the chocolate has cooled and set (the refrigerator can speed up this process considerably), remove the cookies from the sheets and store in airtight containers at cool room temperature for up to 2 weeks.
»»  READMORE...

So, American readers, how was your Thanksgiving? Mine was a blitz of cooking and baking and generous amounts of DayQuil, which, as it turns out, can leave you feeling every bit as festive as Champagne. In the days that have followed, I have been trying not to be too much of a burden on our houseguests as I nurse what is surely the Virus of the Century, alternating sleeping with steam-filled showers and bowls of mish-mashed leftovers bound with gravy.

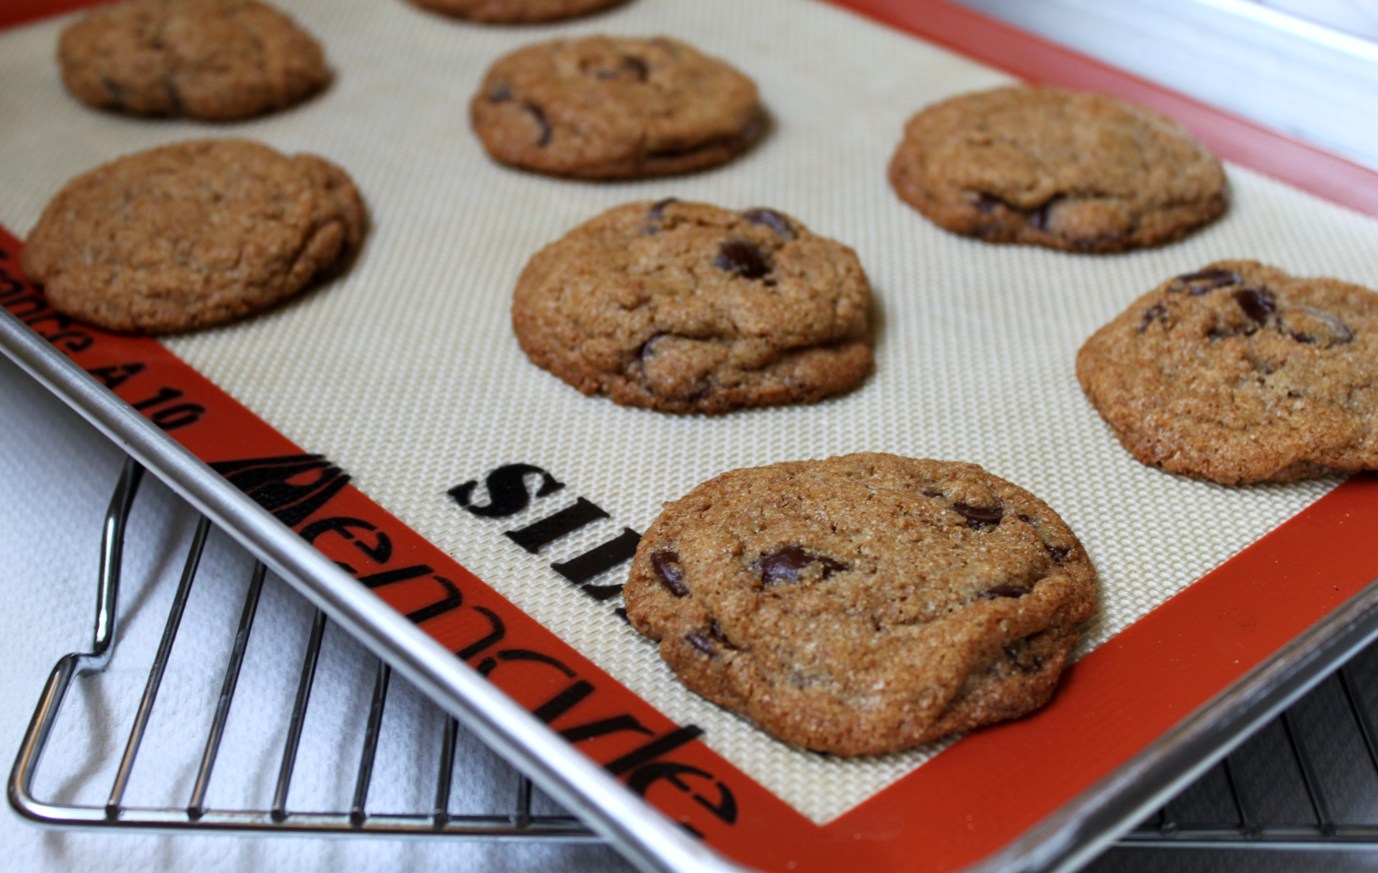
Luckily, I also have a stash of Kim Boyce's Whole Wheat Chocolate Chip Cookie dough all scooped out in a bucket in the fridge. This allows me to wade into the kitchen between naps, bang several onto a sheet pan and bake fresh cookies every afternoon, in a lame effort to appear as though I am a good hostess. A deaf, mute, hacking, bleary-eyed hostess, but nevertheless one who can provide cookies.


If you're one of the many who've picked up a copy of Good to the Grain, then maybe you were as charmed as I was to find that the very first recipe in the book is for Chocolate Chip Cookies. Even when presented with a topic as daunting and stereotype-laden as whole-grain baking, who isn't instantly disarmed and delighted by chocolate chip cookies? Communists, that's who.


And before you go thinking that I'm throwing health food at you during the holiday baking season, don't you worry. These cookies pack tons of chocolate and have all the butter and sugars of the classic, but the all-purpose flour has been 100% swapped out for nutty, nubbly whole wheat flour. So basically what you get here is an amped-up chocolate chip cookie--more addicitive, toasty flavor and a wonderful, hearty, chewy texture, complete with those crack-like buttery, sweet, crispy edges. The use of whole wheat flour is the ultimate flavor booster here, not some propaganda that will be your gateway drug for wearing hemp and arranging sit-ins. I promise.


And really, as long as we're on the subject of things that are all good for you, would it kill ya to sneak in a few extra nutrients during this glorious season of holiday eating? Especially when the vehicle for said nutrients is something so dang perfect and completely delicious? I may not be completely in my right mind right now, high on Sudafed, surrounded by tissues, Ricola wrappers and cookie crumbs, but believe me, I know what I'm talking about here.


Whole-Wheat Chocolate Chip Cookies

Adapted from Good to the Grain

I used a stone-ground whole wheat flour here and absolutely loved the texture, but you can use any kind of whole wheat flour that you like, including the white whole wheat flour that is available in most supermarkets.

Resist the temptation to use semi-sweet chips--the combination of the whole wheat flour and bittersweet chocolate is dynamite. If you use table salt instead of kosher, use roughly half the amount of salt.

The original recipe says that you can bake the cookies right away, but I found that I much preferred the texture and flavor when the dough was chilled before baking, so I'm including it here. I made my cookies a bit smaller, using a 2 tablespoon scoop, and obviously got a higher yield than the original recipe yield of 20 cookies, but the baking time was the same.


Makes 2-3 dozen

3 cups whole wheat flour (see note)
1 ½ teaspoons baking powder
1 teaspoon baking soda
1 ½ teaspoon kosher salt (see note)
2 sticks (8 ounces) cold unsalted butter, cut into ½-inch cubes
1 cup lightly packed dark brown sugar
1 cup sugar
2 large eggs
1 teaspoon vanilla extract
8 ounces bittersweet chocolate (about 62% cacao), chips or chopped

Position racks in the upper and lower thirds of the oven, and preheat it to 350 degrees. Line two baking sheets with parchment or silicone baking mats.

Whisk together the flour, baking powder, baking soda, and salt in a medium bowl.

In the bowl of an electric mixer fitted with the paddle attachment (or with a handheld mixer), beat together the butter and sugars, just to blend. Scrape down the sides of the bowl. Beat in the eggs one at a time. Beat in the vanilla. With the mixer still on low, gradually beat in the flour mixture to the bowl, just until incorporated. Stir in the chocolate chips on low speed.

Scoop mounds of dough about 3 tablespoons in size onto the prepared baking sheets, about 3 inches apart. Chill for about 1 hour (at this point, you can store the chilled dough balls in an airtight container and they will keep for 1 week).

Bake the cookies for 16 to 20 minutes, rotating the sheets halfway through, until the cookies are evenly browned. Let cool for several minutes before transferring the cookies to a wire rack to cool completely.
»»  READMORE...